Saturday 15 October 2016

Mini SpaceNK Haul


It would have been rude if I hadn't taken the opportunity to get £15 in the SpaceNK Explore event so I decided to pick up a few things. It's actually been a while since I ordered anything from SpaceNK, so I thought it was the perfect opportunity to treat myself. 


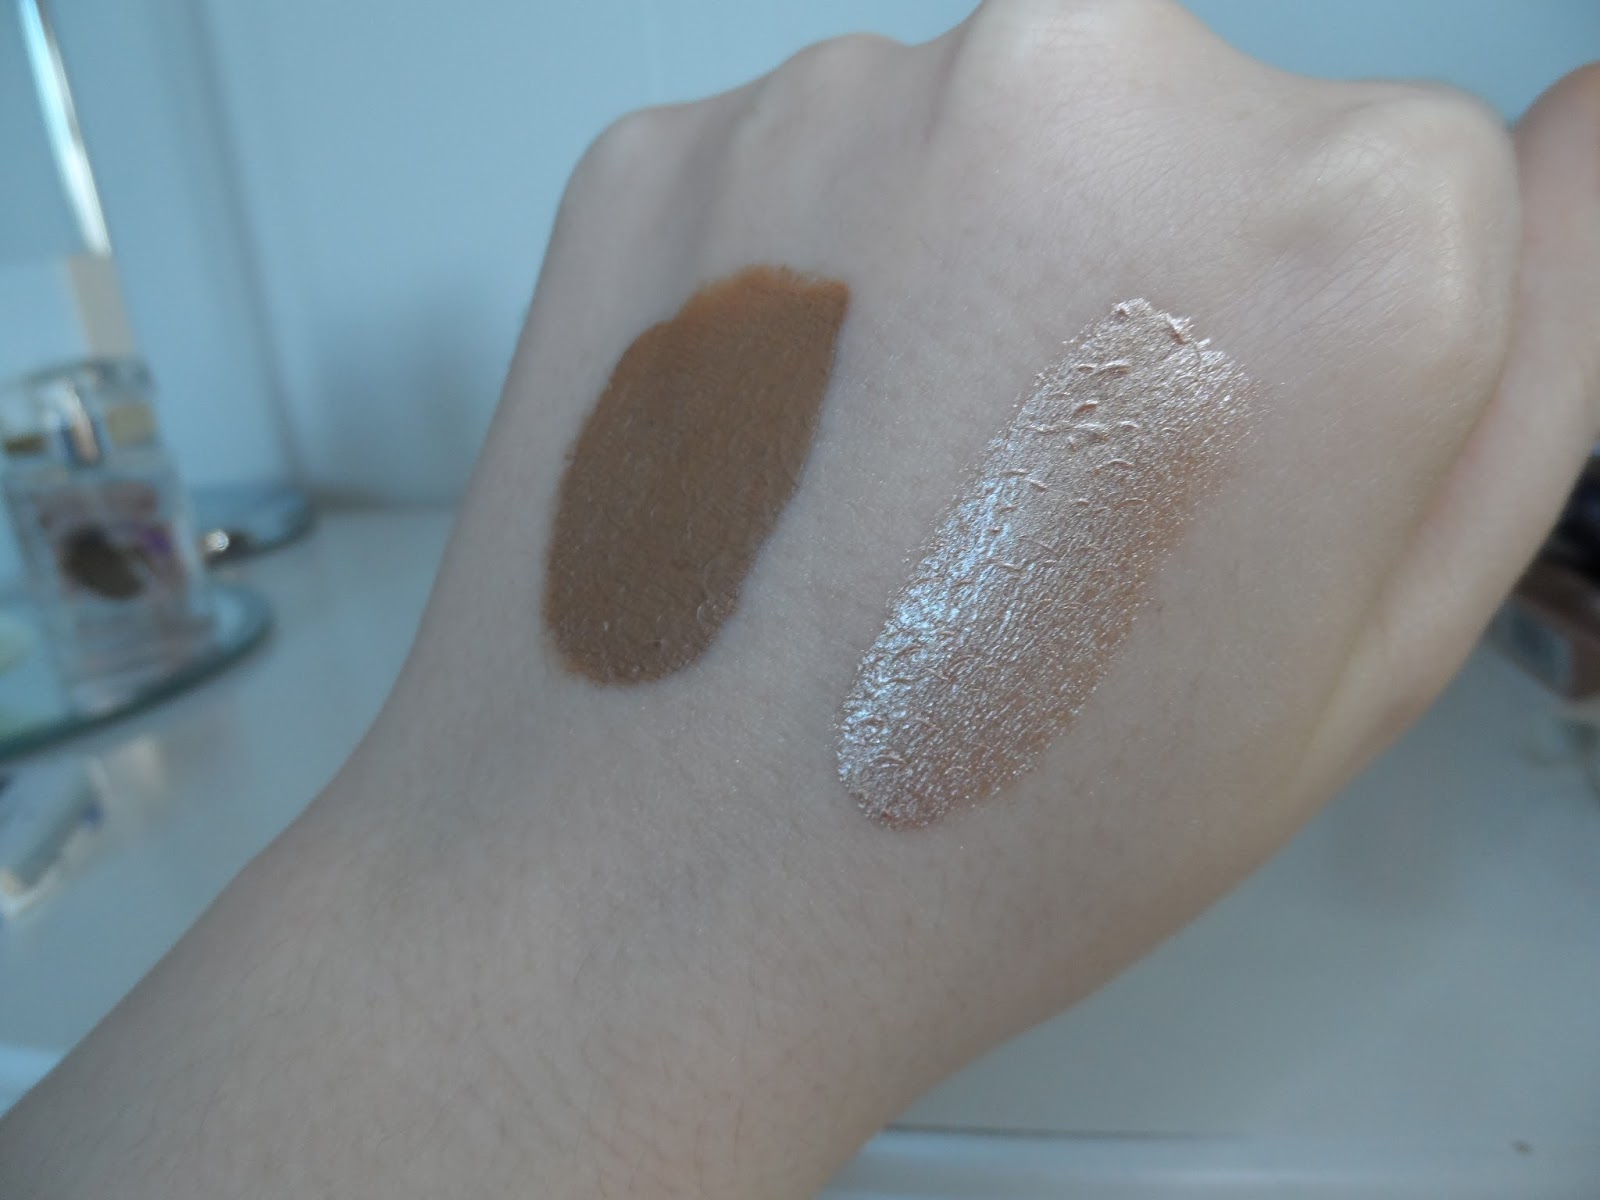
There was a few things that I have been lusting over the past few weeks and decided to take the pludge and order them. The first thing is the Cover Fx Custom Colour Enhancer Drops in the colour 'Sunkissed'. I had seen 'The Anna Edit' (more so known as viviannadoesmakeup) use these in a recent tutorial and as she is a fellow pale girl I thought the colour suited her quiet well and that it would work perfectly for me. I only recieved my parcel today but first things first is that these are so pigmented. I put one drop onto the back of my hand to test the colour and I was able to cover right up to my wrist. I think a little goes a long way when applying this product. It comes in a dropper type bottle, and although I love the idea, I think it could get a little messy. But otherwise I am excited to give them a go.


The second and last purchase I made was another one of the ByTerry Ombre Blackstar Cream Eye shadow pens in the shade Brown Perfection. I already own the shades 'Misty Rock' and 'Bronze Moon' and I have to say they are the perfect go to cream shadows. The fact that they are in the stick form make them so easy to travel with and a lot less messy to apply than those in a pot form. There is something about these shadows that once you apply them to the lid they have a glossy effect but then when they are blended out they create an almost shadow effect without having to use a separate colour on the crease. I have nothing but high hopes for this new shade which is a dark brown with a gold glitter undertone.

A little perk that came along with my order was two samples of the Cover Fx Custom Enhanced drops and they are the cutest samples I have ever seen. They too come in the dropper packaging, one which is a radiance facial oil that can be added to your skincare and the other is a highlight shade in the colour 'Moonlight'. I tried the oil on the back of my hand and whilst it does have an overpowering scent of lemongrass, it did sink into my skin fast and didn't feel at all oily. The Moonlight drops are just something else. It's a champagne toned highlight that's almost metallic it's that pigmented. I have high hopes for this also!


If you have any suggestions of new products you think I might need in my life, feel free to let me know. Remember if you want to save £5 on post and packaging from SpaceNK just enter the code 'snkbath' at the checkout. Happy Shopping! 

Monday 10 October 2016

Contouring & Highlighting for Pale Skin: Drugstore Edition


It's nearing the winter and that can also mean one thing.. the summer tanned skin has well and truly faded. I used to be able to get away with all the bronzer I could have dreamed about a couple of months ago but now I'm back to my pale self again. I know some people are all about embracing the pale, but for me I'd rather have a tan whether that be a faux glow from a bottle or a proper sun tan.

I've found that my usual go to face products were looking a little off colour (so much blending was needed!) so I've had to pull out my go to products for when I'm feeling and looking rather pale. There is nothing more awful and terrifying that that horrible 'orange' line when your foundation meets your neck.

I've been buying make up for years and still to this day I find that the neither Superdrug or Boots have a massive range that cater for paler skins. They have in recent times brought out foundations and concealers but I am still waiting for the perfect contour and highlight. 

In terms of contour, I would recommend the Soap and Glory Solar Powder Bronzer. They have recently changed the packaging from the old cardboard to a plastic and whilst I still own the old packaging I think the product inside is great. It is a split pan with a matt darker colour perfect for contouring and then a light bronze with a touch of shimmer on the other side perfect for bronzer. This product is the perfect ashy tone without being grey which is what you are looking for in terms of a contour. The powder is buildable so can give a subtle or a more dramatic effect.

To apply this, I take my brush and place it to my ear and follow the hollow of my cheek bone right in towards the outer corner of my eye. You don't want to apply this any further into your face as it will only look dirty and make the contour look less natural.

For a cream contour, I have really been enjoying the Maybelline Master Contour Sculpt Duo Stick. It is a double ended crayon that is really creamy. One side is a contour and the other a highlight, so it's perfect for on the go. I like to apply this in the same areas I have talked about above but I love to blend it out using the Real Techniques Contour brush from the Core Collection. 

In terms of highlight, I'll start with primer. The Loreal Lumi Magique Primer is gorgeous, I apply this with my fingers to the tops of my cheek bones and blend it in. I try and avoid the T-zone with this one as it is quite shimmery but it gives a lovely pearly finish without looking that horrible glittery particles that sometimes comes with drugstore highlighters. 

If you are looking for an under eye highlight, I would highly recommend the Maybelline Fit Me concealer. I've talked about this before in a previous post but I cannot recommend it enough. It is perfect for brightening the under eye area without looking cakey.

For a powder shimmer highlight, I have been loving the Sleek Highlight Kit in Solstice. This palette contains 4 highlights, one cream and 3 powders. I can describe the colours as 'icy' and one of them is a strong contender as a dupe for the highly popular Becca Champagne Pop. I apply these with the Real Techniques Setting Brush and to be honest I just use a mixture of all three of them. I like to apply them to the tops of my cheek bones and then onto my cupid bow. Because they are so pigmented, I tend to blend it further with a larger powder brush just so that it looks a little more natural. The 'I heart make up' brand that is stocked in Superdrug have a highlight called Goddess of Love which is beautiful and also a great dupe for the Bobbi Brown Shimmer bricks. 

Boots and Superdurg are always having 3 for 2 offers so that is the perfect opportunity to give some of these recommendations a go. I hope this helps any of my pale faced readers out there. 


Thursday 29 September 2016

Victoria Beckham Edit for Estee Lauder


On a recent trip to London I had seen an advertisement for the new Victoria Beckham for Estee Lauder line. It had not been released at the time so I didn't get to see the full line in person but I patiently waited to see it appear online on the website. There's something so exclusive and special about owning  product that is limited edition and as Estee Lauder is a brand that I hadn't explored beyond foundation/concealer, it was a perfect opportunity to give it a go.

As I am not a bag of money, I decided to only pick up one product. I loved the look of the eye shadows and the glitters but realistically I have plenty already in my stash and I tried to be good. The packaging is what drew me to line line to begin with. The gold leather effect with the gold clasps reminded me alot of the Tom Ford Make Up Packaging. It looks expensive and something different to the usual more girly packaging that I have normally seen on an EL counter.

I love highlighters so I decided this was the product that I wanted to invest in. So having searched all of the online retail stockists I eventually found it to be in stock on the EL website. It was priced at £48 and to be honest, it is very expensive but you are paying for the luxury.  It can be bought here

The package came in the post and was beautifully wrapped. It was encased in a gorgeous Victoria Beckham gift box and then wrapped in white tissue paper. When I opened the highlighter I did notice that it was more peachy/gold than I had seen on the website, I was not disappointed! It is in the colour Modern Mercury. It reminds me a lot of Becca Champage Pop Highlighter in terms of its colour. It is very highly pigmented, however I do feel that although it would be gorgeous on pale skin, I feel that due to it's peachier tone it would be gorgeous when I have a bit of fake tan on. You also get loads of product. And the fact that you need very little means that it will last you for ages! I hardly ever finish or even hit pan on a powder product.


So if you are looking to treat yourself to something luxe or simply want something to add to your Santa list then this is a great contender.

Sunday 11 September 2016

The Best Nail Glue Ever

This is just a very short port today but I just needed to share this little discovery. I am a massive fan of false nails and I have been wearing them for years. As much as I love the convenience of not having to sit and wait for nail polish to dry and the patience and expertise it takes to do lovely designs, I always found that they would last for about 2 days and then they would start to fall off. I had been using the nail glue that comes in the packs from Primark and another type from Elegant Touch but I wasn't getting good longevity out of my nails.


I was in Savers in Tescos one day and I needed nail glue and this was the only type that they had in stock. The thing that drew me to it was the fact that it was called 'Super Glue'. This glue from Nailene is by far the best nail glue that I have ever used and the best part is that it's priced at 89p! Yes that's less than a pound. I am completely amazed at this glue as it holds on my nails for at least a week at a time, which was completely unheard of in the past. The only issue is that it is very hard to find so any time I have seen it in stock I have picked up a couple of bottles to have as a back up. It is also available in Semi Chem but it's priced at around £3. I have tried to source bottles of it online, but they are unable to post to Northern Ireland which makes me think that it has been discontinued or is a US only product. So girls get to your local savers and stock up! 


Friday 15 July 2016

Top 5 Drugstore Budget Concealers


Going into Boots or Superdrug can be daunting, especially with the wide variety of brands and the amount of products each brand has to offer. I've tried and tested over 20 concealers from low end to high end and I have discovered ones that work and ones which are not worth the money. So I have compiled a list of my top five concealers that are easily accessible from Boots or Superdrug and all of which are under £10. In my opinion I think these are the best on the market, as much as I love my higher end counterparts these ones are just as good. Also perfect for fairer skin girls like myself! So here we go...

Rimmel Wake Me Up Concealer is the lightest coverage of the bunch. It is very liquidy and doesn't offer much in terms of covering spots but it is perfect for under the eye. It has radiant glow that doesn't appear to be shimmery on the face. This one is comparable to the YSL Touche Eclat but is a fraction of the price.

Maybelline The Eraser Eye is my go to for a night out. Although this concealer is supposed to be used for it's anti aging properties I just love it's consistency. It is slightly moisturizing and is an absolute dream to blend. It's colour range in the UK is very limited so that is why I tend to only use it when I am slightly more tanned. I love using it to highlight under my eyes and then the center of my forehead and blend it out with the Real Techniques Contour Brush (from the Core Collection). I would compare this to the Chanel/Nars concealers in terms of it's consistency but it is a complete bargain in the other end of the scale. 

The Maybelline Fit Me is another favourite for every day wear. It has a light coverage and does not look cakey. I love using this all over the face and it blends so easily. It's slightly more liquidy than normal concealers but it just glides onto the skin and offers enough coverage without looking dry. I find it to be brightening and leaves a glowy look to the skin, which is why I find it needs to be set with a powder. Otherwise it is comparable to the Clarins Instant Concealer.

The Collection Lasting Perfection Concealer is raved about in the online beauty community. I first tied it about 6 years ago and I fell in love with it. Then after discovering different brands it moved slightly off my radar. However I have always went back to this when I have had paler skin. I use the lightest shade and I have found this to be the only brand on the drugstore market that offers a range suited to proper pale skin. This can be drying if you use too much which is why it should be used sparingly but in terms of coverage and longevity, it is up there with it's higher end counter parts from Estee Lauder. Great for covering spots!

The Rimmel Match Perfection is a relatively new find for me. I seen it being used in a Pixiwoo video and decided to pick it up and see what the fuss was about as I had not heard it being talked about before. This again offers a light coverage and is easy to blend. But it can be built to a medium coverage. This is perfect for under the eyes as it is hydrating and light reflecting. This one is perfect for no make up days as it looks flawless on the skin almost as if you are not wearing any make up.

That is my top 5 concealers from the drugstore. I have loads more in my stash and I'm always up for trying new ones, so I'm up for some suggestions?
Whats your favoruites? 


Saturday 18 June 2016

Flawless Make Up For Blue Eyes // Copper Gold Glitter Eye


This is one of my go-to looks for a night out. I have blue eyes and after a bit of research and experimentation I have worked out that copper and bronze colours make the blue of my eyes stand out! 

I wore this look for my friend's birthday after having spent the past week in Portugal hence the natural tan complexion that lasted a good week. I don't know what it is but when I have a natural tan I feel like my make up applies and sits a lot better. Plus it also means I didn't have to apply fake tan which was an absolute bonus! I am also so suprised at the condition of my skin after the madness of that holiday, which involved a lot of alcohol, late nights and not taking my make up off until around 7am in the morning! So unlike me... but anyways here is the details of my copper glitter make up look.

Base

I used the Too Faced "HangoveRx" Primer (very fitting name for how I was feeling before even heading out lol), this is a hydrating primer that helps to blur pores at the same time. I also used some of the Becca Backlight Priming Filter on the cheeks which gives a gorgeous glow to the skin. 

For foundation I used the No.7 Stay Perfect Superlight Foundation and blended this in using a damp Beauty Blender. For concealer under my eyes I started with the Bobbi Brown Corrector in Peach and topped it with the concealing shade from the Estee Lauder New Demention's Contouring Palette. 

I decided to use a cream bronzer to bornze up my face as I didn't actually own a foundation that was dark enough, For this I used the new L'oreal Glam Bronze Cushion. A little bit of this goes a long way. I applies this to my cheek area and along my hair line and the foundation looked a lot more bronzy.

To set all of this I used the Laura Mercier Loose Setting Powder and some of the Benefit Porefessional Powder around my nose which tends to get very oily. 

For bronzer I used the Tom Ford Bronzer in the shade Gold dust and for blusher I used the Benefit Coralista which is a lovely coral perfect for tanned skin.

For my highlight I used the Laura Mercier Illuminator Powder in the shade Indescretion which is a gorgeous gold toned highlight. 

I set my entire face using the Urban Decay All Nighter Setting Spray. I swear by this stuff!


Just look at that glow!!! I love being tan!
Brows

As always I used the Anastasia Dip Brow Pomade in Caramel and the ABH clear brow setting gel. I had just had my HD brows done for the first time by 'Molly Cooke' the week before so it made filling them in so much handier and quicker. This brow gel sets the brows in place and I promise you they will not budge!

Eyes

I primed with the Urban Decay Primer Potion and then used the Charlotte Tilbury Eyes To Mezmerise Cream Eyeshadow in the shade Bette all over the lid and blended this with a small brush under my lower lash line. For the majority of the shadows in this look I used the Morphe Pallette in 35K. I took the peachy mid toned colour and blended it into my crease, then using the darker warm toned brown I deepened up the crease. I took a mixture of these two colours and blended these onto my lower lash line. 


For the glitter base I took the Too Faced Glitter Glue on a small brush and applied this to the inner third of my lid. I then mixed some of the Mac Pigment in Reflects Bronze along with a loose glitter I bought on Ebay (if you type in eye glitters loads come up, I used the copper one!)  and applied this in a patting motion directly on top of where I applied the glue. 


I then took the Maybelline Gel Eye Liner in the black shade and applied this to my upper and lower water line. I applied some of the Nars Audacious Mascara to my upper and lower lashes. 

Now for my favourite part, the lashes. I've had the Huda Beauty Lashes in Samantha for ages but I never had the nerve to wear them as they are very full on (my mammy even described them as looking like sweeping brushed when I bought them lol). I applied them with my tweezerman tweezers and the duo lash glue in the clear shade. They ok to apply but they were quite heavy and unlike other lashes I have wore in the past, these one's had a very thick band so required very precise application. I eventually got them on and I think they looked ok, they did stick into me a little bit in my inner corner but I'm sure with practice I'll be able to master them in the future. 


Glitter really finishes a simple eye look!
Lips

I used the Rimmel Exaggerate Lip Liner in the shade Eastend Snob to outline my lips and then I topped it with Mac Finally Free lipstick, this had a semi-gloss type finish which I enjoyed wearing as appose to my matte obsession recently. 

Let me know if you have tried any of these products and what you thought of them. I am totally up for suggestions as to new looks I could try out next so make sure and leave them in the comments below!


Wednesday 11 May 2016

Dairy Free Chocolate Brookies (Brownie/Cookies)


I discovered this recipe on Lily Pebble's Blog and it is probably one of the best recipes I have ever came across online. I'm not the biggest fan of brownies purely because I find them too heavy and sickening but I love the taste and when combined with a cookie recipe I couldn't resist giving the recipe a go. Plus the ingredients are simple and I'm sure you will have every one of them in your kitchen cupboards.

Every time I make these people always comment on how good they taste, my friend Grainne called them "the lightest most magical things!" 

The recipe makes around 70 small brookies! They have a very light texture, the outside is slightly crunchie but the inside is spongy but slightly gooey.  The only downside to this recipe is that you need to leave the mixture to set overnight in a fridge, so I would recommend making the mixture the night before you plan on making them, but I promise it is well worth the wait! 

So here's what you need...

Ingredients:


  • 85g good quality cocoa powder
  • 400g caster sugar
  • 125ml vegetable oil
  • 4 eggs
  • 2 teaspoons vanilla extract
  • 250g plain flour
  • 2 teaspoons baking powder
  • 1/2 teaspoons baking powder
  • 60g icing sugar


Equipment:


  • Large bowl
  • Wooden Spoon or Electric Mixer
  • Sieve
  • Cling Film
  • Baking Paper 
  • 2 Baking Trays
  • Plate
  • Teaspoon
  • 2 Cooling Racks


1) In a large bowl, mix together the cocoa powder, caster sugar and vegetable oil until they are well combined. 

2) Then beat in one egg at a time, making sure that there are no lumps.

3) Then add in the vanilla extract. Next add in the salt. Sieve in the flour and baking powder. Mix this until it is well combined. 

4) Once you have finished mixing, cover the bowl with cling film and place in the fridge over night. 

The next day: once the mixture has set...

5) Preheat the oven to 180'C or Gas Mark 4. 

6) Line the baking trays with baking paper, you will be making them in batches so you might need to change the paper between each batch.

7) Pour the icing sugar onto a plate.

8) Take the mixture out of the fridge and using a teaspoon, scoop up small dollops of the mixture and roll it in the icing sugar to form a ball. Make sure the ball is covered in icing sugar and then place this on the tray. PS it is messy but oddly therapeutic.

9) Repeat step 8 until you have filled each tray and make sure they are spaced apart on the tray so that they don't merge together whilst cooking.

10) Place the trays into the preheated oven for 10-12 minutes.

11) Once the time is up allow them to cool for 5 minutes on the trays before transferring them onto a cooling rack and then preparing the rest of the mixture as stated above onto the trays.


If your any way like me, the majority of them will be eaten before they have had a chance to cool but I hope you enjoy this recipe just as much as I do. If you do make them, make sure to take a picture and send them into my facebook page 'Maria Glenn' so I can see all the magical creations and let me know what you think!